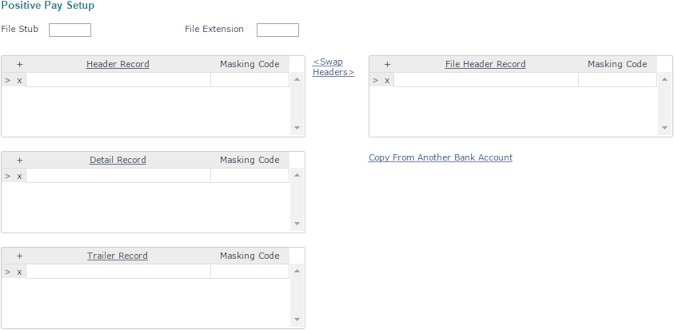
Positive Pay Setup
Use the Positive Pay Setup form to set up the positive pay file for the bank account. To access the form, open the Actions menu in Bank Accounts and select Positive Pay Setup.
The Positive Pay file is created by interpreting the specifications from the bank, entering the Header, File Header, Detail, and Trailer Record parameters, and entering the appropriate UniData Masking Codes.
Note: Enter the masks required for the fields using standard UniData masking parameters. For example, R%10 places the item on a field of 10 zeroes. See Table 66 for a list of commonly used parameters.
To set up positive pay:
|
1.
|
Access the setup form: click the Back Office menu and select System|Change > Bank Accounts. Then, click the Actions menu and select Positive Pay Setup. |
|
2.
|
To copy existing positive pay information, click Copy From Another Bank Account. Enter the bank account ID and then click Copy. |
|
3.
|
Enter a File Stub code. The system can group all accounts with the same file stub together for downloading, and it appends the year, month, and day to create the file name. For example, if you have multiple accounts with the same financial institution, enter the same File Stub for each account. |
|
4.
|
Enter the positive pay File Extension that defines the file type, typically .txt. |
|
5.
|
Set up the header record information, which determines the format for the header information for each record included in the overall positive pay file your organization will send to the bank: |
|
•
|
Select the Header Record parameter that matches the header specification from the bank. |
|
•
|
Enter the UniData Masking Parameter required for the record in the Masking Code field. |
|
6.
|
Set up a detail record information, which specifies the format for the individual checks that are grouped under each header: |
|
•
|
Select the Detail Record parameter that matches the detail specification from the bank. |
|
•
|
Enter the UniData Masking Parameter required for the record in the Masking Code field. |
|
7.
|
Set up a trailer record information; trailer records indicate the end of a group of checks: |
|
•
|
Select the Trailer Record parameter that matches the trailer specification from the bank. |
|
•
|
Enter the UniData Masking Parameter required for the record in the Masking Code field. |
|
8.
|
Set up a file header record information, which is used for the entire file sent to the bank: |
|
•
|
Select the File Header Record parameter that matches the file header specification from the bank. |
|
•
|
Enter the UniData Masking Parameter required for the record in the Masking Code field. |
Table 66: Commonly Used UniData Masking Parameters
| Parameter |
Definition |
Example |
| CRLF |
Carriage return and line feed |
Moves cursor to the next line |
| DD |
Converts a date format to a day of the
month |
Converts a date format 7-14-2017 to 14. |
| DM |
Converts a date format to a numbered
month |
Converts date format 7-14-2017 to 7. |
| DY |
Converts a date format to a numbered
year |
Converts date format 7-14-2017 to 2017. |
| D4- |
Converts a UniData date to a date with
month-date-year format |
Converts UniData date 14806 to
7-14-2008. |
| D2/ |
Converts a UniData date to a date with
month-date-year format |
Converts UniData date 14806 to
7/14/08. |
| L#XX |
Left justify text and pad with spaces |
L#8 will cause “text” to appear as
text_ _ _ _. |
| R%XX |
Right justify numbers and pad with
zeros |
R% 8 will cause “1234” to appear as
00001234. |
Note: Go to http://www.ibm.com/us/ and search for the latest IBM UniData Commands Reference for additional UniData Masking parameter information.
Related Topics
Maintaining Bank Accounts
Create Positive Pay Files
Recreate Positive Pay Files
Positive Pay File Report
