This page has moved and will no longer be updated. To access the current page, click the Online Help  icon in PrismHR or navigate to the new help docs site and search for your topic.
Performing Standard Pay Imports
Importing pay data from time keeping systems typically requires a combination of the methods described (usually methods 2 and 3) due to the various levels of information being imported.
You will define the parameters related to the import, then decide how you will map the time keeping system codes to PrismHR codes by:
|
•
|
Defining the parameters of import |
|
•
|
Mapping foreign codes to existing PrismHR pay codes |
|
•
|
Defining which data to import from the data file |
Pay Import Definition
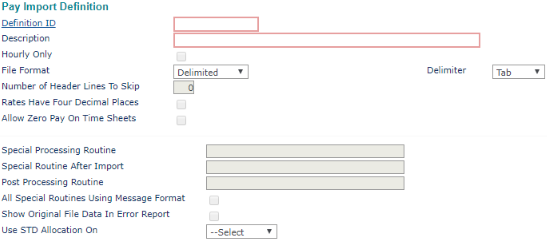
Use the Pay Import Definition form to define the parameters of a specific import scenario. Once set up, the Import Definition can be used repeatedly providing the import scenario does not change.
To define the parameters:
|
1.
|
Open Pay Import Definition (found in the Back Office menu under System|Change). |
|
2.
|
Enter the Definition ID and Description used for this import definition. |
|
3.
|
Select Hourly Only to only allow hourly employees to be loaded from the download. |
|
4.
|
Select the File Format and Delimiter used to delimit the import record fields. |
|
5.
|
If necessary, enter a value for Number of Header Lines to Skip. This setting skips any header content lines in the import file, and begins the import after that. For example, if the first line in the file has the column headings, and the second line is the first record, enter 1. |
|
6.
|
Select Rates Have Four Decimal Places if the pay rates have four decimal places. |
|
7.
|
Select Allow Zero Pay on Time Sheets if zero amounts should be passed to time sheets. |
Note: Do not use the Special Processing Routine fields unless directed to do so by the PrismHR Customer Support Team.
|
8.
|
Enter the Special Processing Routine used to convert this import file. |
|
9.
|
Enter the Special Routine after Import to execute immediately after importing the file. |
|
10.
|
Enter the Post Processing Routine to execute at the end of the import process. |
Note: You must select All Special Routines Using Message Format if this is a web-based import. If this parameter is not selected, do not select it unless directed to do so by the PrismHR Customer Support Team.
|
11.
|
Select All Special Routines Using Message Format if the system uses a routine to pass back status and message information. |
|
12.
|
Select Show Original File Data in Error Report if the error report should show the complete line of data from the original file. |
|
13.
|
From the Use STD Allocation On drop-down, select the standard allocation to use for time. |
In the When Posting Imported Data to Time Sheets panel:

|
14.
|
From the Clear Existing Pay From Time Sheets for drop-down, select how to manage existing information: |
|
•
|
All Employees: Clears all pay information for all employees in a batch when the file imports. |
|
•
|
Employees in Import File Only: Employee data in the import file overwrites any existing data only for those employees. If other employee data exists in the payroll batch, their data is preserved. |
|
•
|
None: No data is cleared. |
Note: If you chose to clear existing pay (All Employees or Employees in Import File Only), you can only select Overwrite existing amounts from the Update existing pay on time sheets drop-down. If you chose not to clear existing data (None), then you can choose a method for how to handle existing pay.
|
15.
|
From the Update existing pay on time sheets drop-down, select whether the imported data overwrites any existing pay data or adds to it. |
|
16.
|
Select Auto Add Option (when employee is in file import but not on payroll) to have the system automatically add active employee time sheets. |
|
•
|
Auto Add Active Employees to Payroll: The system automatically adds the time sheets for all active employees. There are some instances where employees will not be added: |
|
•
|
The employee’s onboarding is still in progress. |
|
•
|
It is a regular or special batch and the employee’s pay group is not included. |
|
•
|
Auto Add All Employees to Payroll: The system automatically adds all employees to the time sheet. This affects employees who were terminated and re-hired. They need to be paid but have not yet been re-hired in the system. They must also be assigned to the pay group in the import. |
|
•
|
Do Not Auto Add: The system will not automatically add active employees. |
|
17.
|
Select Recalculate Overtime Pay Rate to have the system recalculate overtime pay rates (based on the rate multiplier) on imported overtime hours that use the definition. |
For example, an employee is included in the import with a pay rate of $10. If this option is not selected, then the employee will be paid $10. If this option is selected, then the employee will be paid at the overtime rate (such as $15 for a 1.5 multiplier).
Standard Pay Import - Method 1 - Mapping
The first method describes the process of setting up pay data import information by “mapping” pay codes from a time keeping system to existing pay codes in PrismHR.
Note: The data in the following table will be used as an example to set up the Import Field Definitions and the Import Translation Maintenance screens.
Table 122: Method 1 - Pay Data Format Example
| Employee |
SSN |
Pay Code |
Amount |
Dept |
| FORCE, GAYLE |
205-58-9764 |
REGULAR |
32 |
ADMIN |
| FORCE, GAYLE |
205-58-9764 |
VACATION |
8 |
|
| ZILINSKI, STREUDEL |
019-19-4545 |
REGULAR |
40 |
OPER |
| ZILINSKI, STREUDEL |
019-19-4545 |
OVERTIME |
2 |
OPER |
| MURPHY, SCUD |
010-00-2250 |
REGULAR |
40 |
PIS |
| PINTIN, BORIS |
060-26-6226 |
REGULAR |
24 |
PIS |
| PINTIN, BORIS |
060-26-6226 |
PTO |
16 |
|
| SPRINKLE, PERRY |
221-14-1952 |
REGULAR |
40 |
PREP |
| TANG, PYONG |
550-45-1976 |
REGULAR |
40 |
PREP |
| TANG, PYONG |
550-45-1976 |
OVERTIME |
5 |
|
| PING, HO-CHI |
140-49-4949 |
REGULAR |
40 |
PT |
| ERICSON, KRISTIN |
031-72-0061 |
REGULAR |
36 |
PT |
| ERICSON, KRISTIN |
031-72-0061 |
SICK |
4 |
|
| BROOK, REEDY |
420-04-1888 |
PTO |
40 |
40 |
| MILLER, SEB |
131-02-9876 |
REGULAR |
40 |
220 |
| MILLER, SEB |
131-02-9876 |
OVERTIME |
1.5 |
|
| PEDD, BI |
990-33-1358 |
REGULAR |
40 |
220 |
| FROMMARUBA, CHARLIE |
610-05-6242 |
REGULAR |
40 |
220 |
| SHIN, GUNG-FU |
522-21-4355 |
VACATION |
40 |
220 |
| MCKENSEY, HORTENSE |
014-14-1944 |
REGULAR |
40 |
220 |
| MCKENSEY, HORTENSE |
014-14-1944 |
OVERTIME |
0.5 |
|
| CHEAP, URIAH |
452-14-1256 |
REGULAR |
40 |
220 |
To create an import definition for Method 1:
|
1.
|
Open Pay Import Definition (found in the Back Office menu under System|Change). |
|
2.
|
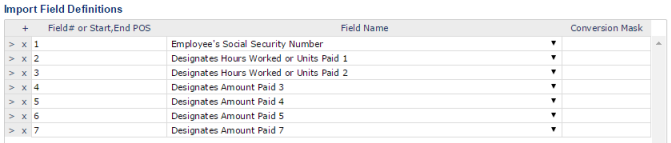
Enter the appropriate information in the Import Field Definitions panel. This information defines which fields of the external file will be imported into PrismHR and how the data will be treated. |

Note: Do not use the Conversion Mask column unless you have been directed to do so by the PrismHR Customer Support Team.
|
3.
|
Leave the Conversion Mask column blank if data is presented in the proper format. |
|
4.
|
Enter the codes into the Import Translation Table to map the pay codes used in the external file to those in PrismHR. |

Standard Pay Import - Method 2 - Matching
The second method involves importing pay data that has been prepared to match the client’s existing time sheet column headings.
Note: The data in the table below will be used as an example for Method 2 and represents the information coming from the time keeping system.
Table 123: Method 2 - Pay Data Format Example
| SSN |
REGULAR |
OVERTIME |
BONUS |
SICK |
PTO |
AUTO
ALLOW |
| 205-58-9764 |
40 |
3.5 |
100.22 |
2.0 |
8.0 |
100.0 |
| 234-09-8765 |
50 |
4.0 |
50.0 |
6.0 |
8.0 |
100.0 |
| 019-19-4545 |
45 |
2.5 |
60.0 |
5.0 |
6.0 |
100.0 |
| 020-09-9876 |
32 |
6 |
75.0 |
6.5 |
7.0 |
100.0 |
| 010-00-2250 |
40 |
4.0 |
62.50 |
6.0 |
8.0 |
100.0 |
| 060-26-6226 |
40 |
3.5 |
77.0 |
8.0 |
8.0 |
100.0 |
| 987-65-4321 |
55 |
4.0 |
80.0 |
7.0 |
8.0 |
100.0 |
| 221-14-1952 |
60 |
6.0 |
66.0 |
6.0 |
8.0 |
100.0 |
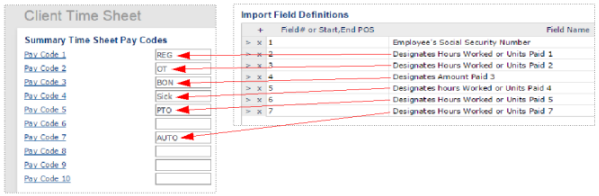
The Import Field Definitions correspond to the Pay Code Columns 1, 2, 3, 4, 5 and 7 on your Company Master Maintenance SF6 - Headings tab, as shown below.
Note: Pay Code Columns 6 and 8 are not used.
To create an import definition for Method 2:
|
1.
|
Open Client Details (found in the menu under Client|Change). Select the Time Sheet tab to open the Client Time Sheet form. |
|
2.
|
Fill in the fields on the Time Sheet Pay Data Import Definition form with the values as described in "Standard Pay Imports". |
|
3.
|
Enter the information into the Import Field Definitions table. This information defines which fields of the external file will be imported into PrismHR and how the data will be treated. |
Note: The values 1,2,3, etc., associated with the Designates Amount Paid #and Designates Hours Worked or Units Paid # Field Names as shown in Figure 4 correspond with the type of pay data in the Pay Code Column Headings in the Client Details form.
Note: Any field that is missing will be skipped.
Note: The Convert column is used when data is presented in a non-native format. For example, if 80 hours was listed as 8000 with no decimal, enter MR2 (masked right with two decimal places) in the Convert column. Contact F. W. Davison & Company for other Convert codes that are available.
|
4.
|
Leave the Conversion Mask column blank. For Method 2, no translation is needed since the pay codes are controlled by the Client Details form. |
WARNING: A change in the Pay Code Column Headings on the Company Master Maintenance record will impact Method 2.
Standard Pay Imports - Method 3
The third method involves importing more pay codes than are defined in the Client Details form. This method can also be used for importing pay codes from time clock systems that create one record per employee.
If a pay code column is not available on the existing time sheet (as defined on the Client Details form) or you do not want to use those columns, you can number each pay code column using a range of 10 - 20 as shown below and import the unsupported pay codes.

To create an import definition for Method 3:
|
1.
|
Select System|Change|Pay Import Definition. The Pay Import Definition form opens. |
|
2.
|
Fill in the fields on the Pay Import Definition form with the values as described in the section above. |
|
3.
|
Enter the Foreign Code (C10* - C20*) and the Prism Code for each pay code to be converted. |

Note: Foreign Code Columns are entered as C10* - C20* in the Import Translation Maintenance panel as values C10* - C11* in the Foreign Code column shown below represent the data columns that will be imported from the time clock system as shown in Figure 6.
|
4.
|
Leave the PTO Type Flag column blank. |
|
5.
|
Enter the Field # and the Field Name for each pay code to be converted. |

Field Name Definitions
The following table provides a description of the codes used in the Field Name column in the Import Field Definitions panel.
Table 124: Field Name Descriptions
| CODE |
F3 HELP DESCRIPTION |
COMMENTS |
| $DATE |
Date worked or Period End Date |
Optional: Used if the import supports multiple work days, where the day of work if significant for Overtime calculations or Certified Payroll. This field otherwise indicates the 'Period End' if all data are sent in summary. Note that the date entered here must correspond with the date of the batch open, otherwise the data will not be 'seen'. If not supplied, works as standard Prism with all time accrued on the last Work Day. |
| $SSN |
Employee’s Social Security number |
Optional. |
| $EMPID |
Prism employee ID |
Optional. As seen on the Employee Master Maintenance screen. |
| $CLOCKNO |
Time clock employee ID |
This is the employee number field on the Employee Master Maintenance screen - NOT the clock number field. |
| $CODEPOS |
Pay code auto-locates correct position. |
See Method 1. |
| $HOURSPOS |
Must be used with $CODEPOS |
See method 1. Shows hours paid. If no $HRSWRKPOS, then also show hours worked. |
| $AMOUNTPOS |
Must be used with $CODEPOS. |
See Method 1. Shows a flat amount payment. |
| $VARPOS |
Auto decide if hours or amount by code in CODEPOS. |
See Method 1. |
| $HRSWRKPOS |
Hours worked (used with $CODEPOS). |
See Method 1. Shows hours worked. Must be used with an $HOURSPOS or $VARPOS. |
| $CODE1 |
Designates pay code 1 (detail only). |
See Method 2. Each $CODEX column of Method 1 relates back to the matching pay code set up on the Company Master Maintenance screen. See Note 1 below this table. |
| $HOURS1 |
Designates hours worked or units paid. |
Note that on all of Method 2, each code must have either an $HOURSX or $AMOUNTX - but not both. |
| $AMOUNT1 |
Designates amount paid 1. |
Note that on all of Method 2, each code must have either an $HOURSX or $AMOUNTX - but not both. |
| $CODE2 |
Designates pay code 2 (detail only). |
See Method 2. Each $CODEX column of Method 1 relates back to the matching pay code set up on the Company Master Maintenance screen. See Note 1 below this table. |
| $HOURS2 |
Designates hours worked or units paid. |
Note that on all of Method 2, each code must have either an $HOURSX or $AMOUNTX - but not both. |
| $AMOUNT2 |
Designates amount paid 2. |
Note that on all of Method 2, each code must have either an $HOURSX or $AMOUNTX - but not both. |
| $CODE3 |
Designates pay code 3 (detail only). |
See Method 2. Each $CODEX column of Method 1 relates back to the matching pay code set up on the Company Master Maintenance screen. See Note 1 below this table. |
| $HOURS3 |
Designates hours worked or units paid. |
Note that on all of Method 2, each code must have either an $HOURSX or $AMOUNTX - but not both. |
| $AMOUNT3 |
Designates amount paid 3. |
Note that on all of Method 2, each code must have either an $HOURSX or $AMOUNTX - but not both. |
| $CODE4 |
Designates pay code 4 (detail only). |
See Method 2. Each $CODEX column of Method 1 relates back to the matching pay code set up on the Company Master Maintenance screen. See Note 1 below this table. |
| $HOURS4 |
Designates hours worked or units paid. |
Note that on all of Method 2, each code must have either an $HOURSX or $AMOUNTX - but not both. |
| $AMOUNT4 |
Designates amount paid 4. |
Note that on all of Method 2, each code must have either an $HOURSX or $AMOUNTX - but not both. |
| $CODE5 |
Designates pay code 5 (detail only). |
See Method 2. Each $CODEX column of Method 1 relates back to the matching pay code set up on the Company Master Maintenance screen. See Note 1 below this table. |
| $HOURS5 |
Designates hours worked or units paid. |
Note that on all of Method 2, each code must have either an $HOURSX or $AMOUNTX - but not both. |
| $AMOUNT5 |
Designates amount paid 5 |
Note that on all of Method 2, each code must have either an $HOURSX or $AMOUNTX - but not both. |
| $CODE7 |
Designates pay code 7 (detail only). |
See Method 2. Each $CODEX column of Method 1 relates back to the matching pay code set up on the Company Master Maintenance screen. |
| $HOURS7 |
Designates pay code 7 (detail only). |
See Method 2. Each $CODEX column of Method 1 relates back to the matching pay code set up on the Company Master Maintenance screen. |
| $HOURS7 |
Designates hours worked or units paid. |
Note that on all of Method 2, each code must have either an $HOURSX or $AMOUNTX - but not both. |
| $AMOUNT7 |
Designates amount paid 7. |
Note that on all of Method 2, each code must have either an $HOURSX or $AMOUNTX - but not both. |
| $AMOUNT10 |
Designates amount paid 10. |
See Method 3. See Note 2 below this table. |
| $HOURS10 |
Designates hours worked 10. |
|
| $AMOUNT11 |
Designates amount paid 11. |
See Method 3. See Note 2 below this table. |
| $HOURS11 |
Designates hours worked 11. |
|
| $AMOUNT12 |
Designates amount paid 12. |
See Method 3. See Note 2 below this table. |
| $HOURS12 |
Designates hours worked 12. |
|
| $AMOUNT13 |
Designates amount paid 13. |
See Method 3. See Note 2 below this table. |
| $HOURS13 |
Designates hours worked 13. |
|
| $AMOUNT14 |
Designates amount paid 14. |
See Method 3. See Note 2 below this table. |
| $HOURS14 |
Designates hours worked 14. |
|
| $AMOUNT15 |
Designates amount paid 15. |
See Method 3. See Note 2 below this table. |
| $HOURS15 |
Designates hours worked 15. |
|
| $AMOUNT16 |
Designates amount paid 16. |
See Method 3. See Note 2 below this table. |
| $HOURS16 |
Designates hours worked 16. |
|
| $AMOUNT17 |
Designates amount paid 17. |
See Method 3. See Note 2 below this table. |
| $HOURS17 |
Designates hours worked 17. |
|
| $AMOUNT18 |
Designates amount paid 18. |
See Method 3. See Note 2 below this table. |
| $HOURS18 |
Designates hours worked 18. |
|
| $AMOUNT19 |
Designates amount paid 19. |
See Method 3. See Note 2 below this table. |
| $HOURS19 |
Designates hours worked 19. |
|
| $AMOUNT20 |
Designates amount paid 20. |
See Method 3. See Note 2 below this table. |
| $HOURS20 |
Designates hours worked 20. |
|
| $DEPT |
Designates override department code. |
Optional: replaces the employee’s Home department for this pay line. |
| $DIV |
Designates override division code. |
Optional: replaces the employee’s Home division for this pay line. |
| $SHIFT |
Designates override shift code. |
Optional: replaces the employee’s Home shift for this pay line. |
| $LOC |
Designates override location code. |
Optional: replaces the employee’s Home location for this pay line. |
| $PROJ |
Designates override project/cost center code. |
Optional: replaces the employee’s Home project code for this pay line. |
| $JOB |
Designates override job code. |
Optional: replaces the employee’s Home job code for this pay line. |
| $CLIENTGL |
Designates client override G/L code. |
Optional: used if the client has specific G/L accounting that needs to flow with this pay line. |
| SKIP |
DO NOT PROCESS THIS FIELD. |
Optional: used if you have a column in the download you do not need, but want to keep a full list of columns in the file. Designate that column as a SKIP. If a column number is not present, it is the same as skipped. |
Note: $CODE1 - $CODE5 are not typically used since the position sets the code. Use of these codes will force a “Detail” time sheet line to be built.
Note: Each mapped column can only have either $AMOUNTXX or $HOURSXX, but not both. For example, JURY must be $HOURSXX, while BONUS must be $AMOUNTXX. Codes 10 -20 allow pay data columns to be imported that are not part of the standard Company setup, and if all used, represent support for more than 15 standard types of pay which has thus far handled the widest import spreadsheets presented.
Copying a Definition ID
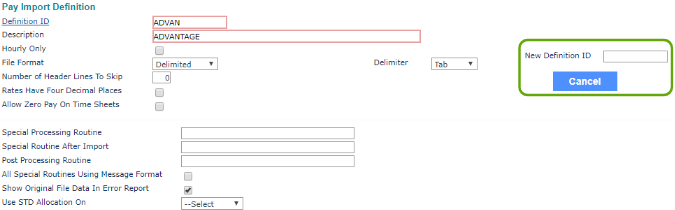
You can copy an existing Pay Import Definition ID for use in setting up a new ID.
To copy an existing definition ID:
|
1.
|
in the Back Office menu, navigate to System|Change|Pay Import Definition. The Pay Import Definition form opens. |
|
2.
|
Select the Definition ID to be copied. |
|
3.
|
From the Pay Import Definition form, click the Actions menu and select Copy. |
|
4.
|
The New Definition ID field displays as shown below. |
|
5.
|
Enter the New Definition ID. |
|
6.
|
A pop-up window displays informing the user the new definition ID was created. |
