This page has moved and will no longer be updated. To access the current page, click the Online Help  icon in PrismHR or navigate to the new help docs site and search for your topic.
Setting Up ACH Deposits with Cachet Financial Services
This article describes the process of setting up an ACH Originator in PrismHR for Cachet.
This process includes:
|
•
|
Setting up Cachet as your ACH Originator |
|
•
|
Creating a bank account for the client |
|
•
|
Creating/adjusting your existing payroll checking account |
|
•
|
Assigning the checking account to client companies |
Setting Up Cachet as Your ACH Originator
In order to set up Cachet as an ACH Originator, you must first confirm that consolidated ACH file processing is enabled.
To enable consolidated ACH file processing, do the following:
|
1.
|
Click Back Office. Select System Parameters under System|Change. The System Parameters form opens. |
|
2.
|
In the Consolidated ACH File Processing Used field, select Yes, if it is not already selected. |
Once this setting has been confirmed, begin the process of setting up ACH Originators.
|
3.
|
Click Back Office. Select ACH Originators under System|Change. The ACH Originators form opens. |
|
4.
|
Enter the appropriate ACH File Originator information for Cachet by completing the following fields. See Using ACH Originators for information about the other fields on this form. |
|
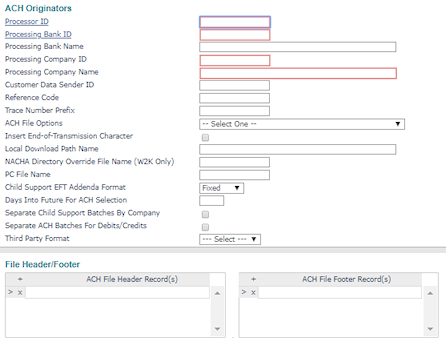
Processor ID
|
Enter or select the financial institution. The PrismHR Customer Support Team recommends that you use easy-to-remember abbreviations for the processor IDs. (Note: Do not enter spaces in this field.)
|
| Processing Bank ID |
Enter or select the bank routing number for your bank. |
| Processing Company ID |
Enter your Federal IRS Number (FEIN), beginning with the number 1. For example, if your FEIN number is "240000054," then enter 1240000054. |
| Processing Company Name |
Enter your company name as the PEO. |
| ACH File Options |
Select the Put Company ID on ACH file detail lines position 40-54 option. |
|
Third Party Format
|
Select Cachet.
|
|
5.
|
In the Cachet panel, do the following: |
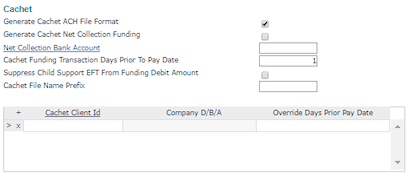
| Generate Cachet ACH File Format |
Select this field. |
| Cachet Funding Transaction Days Prior To Pay Date |
Enter 1 in this field. |
Note: Do not enter other information or select other fields in this panel.
Creating a Bank Account for the Client
To continue the ACH setup process, you must create a bank account for each client. For example, if there are 100 clients, then you need to create 100 client bank accounts.
To create a client bank account, do the following:
|
1.
|
Click Back Office. Select Bank Accounts under System|Change. The Bank Accounts form displays. |

Note: Enter the same information as found on the Billing tab in the Client|Change > Client Details form, specifically in the Electronic Billing panel.
|
2.
|
Complete the following fields to continue the bank account setup for each client you want to include in the Cachet file. See Maintaining Bank Accounts for information about the other fields. |
| Account ID |
Enter or select your checking number, which must be an integer. |
| Reference |
Enter the client's name. |
| Bank Name/Bank Address |
Enter the bank's name and address that the client uses. |
| Offset Account ID |
Enter or select the ID of your bank where you deposit or withdraw funds. |
|
Rebate Bill Code
|
Enter NETPAY.
|
|
Employer ID
|
Enter or select the employer ID, which is the same ID on the Client Details record for that client, or enter the employer ID on your bank account, if the client is assigned a bank account with a different employer.
|
|
3.
|
In the ACH Setup panel, enter the following information: |
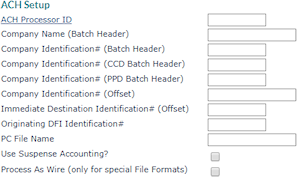
| ACH Processor ID |
Enter or select the same ACH Processor ID that you created earlier. |
| Company Name (Batch Header) |
Enter the client's company name. |
Creating/Adjusting Your Existing Payroll Checking Account
Cachet requires two checking accounts to perform ACH processing: one account for direct deposits to employees, and a second account for withdrawals from your client.
Note: These steps may vary depending upon your payroll checking account set up. Please log in to the Customer Resource Center and click Request Customer Support, if you have any questions. A support representative will contact you as soon as possible.
Making Adjustments to Your Checking Account
If you have an established checking account for payroll, and you want to have Cachet process your ACH, then you need to input an Offset Account ID in the Bank Accounts form and change the ACH Processor ID to Cachet in the ACH Setup panel.
To make adjustments to your bank account, do the following:
|
1.
|
Click Back Office. Select Bank Accounts under System|Change. The Bank Accounts form opens. |
|
2.
|
In your bank account, in the Offset Account ID field, enter or select the ID of the account you set up earlier. |
|
3.
|
In the ACH Setup panel, enter the following information: |
| ACH Processor ID |
Enter or select the ACH Processor ID that you created earlier. |
| Company Name (Batch Header) |
Enter your company name. |
Creating a New Checking Account for Client Withdrawals
To create a new checking account for client withdrawals, do the following:
|
1.
|
Click Back Office. Select Bank Accounts under System|Change. The Bank Accounts form opens. |
|
2.
|
Enter the new Account ID and the same bank information as your established checking account. |
|
3.
|
In the ACH Setup panel, enter the following information: |
| ACH Processor ID |
Enter or select the ACH Processor ID that you created earlier. |
| Company Name (Batch Header) |
Enter your company name. |
Note: If you do not have an account established for payroll, then you need to create a new checking account for employee deposits and employee withdrawals.
Assigning the Checking Account to Client Companies
To assign the checking account to client companies, do the following:
|
1.
|
In the Client menu, select Client Details (under Client|Change). The Client Details form opens. |
|
2.
|
Select the Account tab. |
|
3.
|
In the Bank Accounts panel, enter the following information: |
| Direct Deposit Account |
Assign the Bank Account that you created earlier. |
| Receipts Account |
Enter your Bank Account where invoice payments and other payroll transactions related to this client will be processed. |
