This page has moved and will no longer be updated. To access the current page, click the Online Help  icon in PrismHR or navigate to the new help docs site and search for your topic.
Unpaid Employees Report
The Unpaid Employees Report displays payroll information for employees who received no earnings in a specific payroll or during a payroll period. For example:
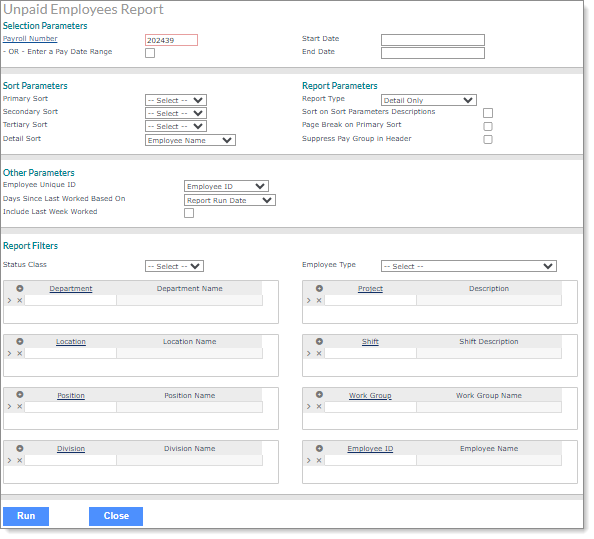
To display payroll information for employees:
|
1.
|
Enter the Selection Parameters to determine what displays on the report: |
|
•
|
Enter the Payroll Number to run this report for a specific payroll or select Enter a Pay Date Range to enter a Start Date and an End Date to run this report for a date range. |
Note the following:
|
•
|
If an employee was paid on any payroll in the pay date range, they will not display in the report. |
|
•
|
When you enter either a payroll or pay date range, the system tries to build the employee data as it was at the time the payroll was calculated. For example, if you enter a payroll in January and an employee was in a department and then was transferred in February, the system only uses the employee settings from January. |
|
2.
|
Set the Sort Parameters: |
|
•
|
Select the Primary Sort, Secondary Sort, and Tertiary Sort categories. |
|
•
|
Select the Detail Sort to specify the way information displays and sorts on the report (Employee Name, Employee ID, Department, Division, Location). |
|
3.
|
Set the Report Parameters: |
|
•
|
Select the Report Type: |
|
•
|
Detail w/Break Totals: Includes a break and a sub-total for each of the sort options entered (except employee name), as well as a grand total for all employees. |
|
•
|
Detail Only: Includes the detail information without sub-totals, only a grand total for all employees. |
|
•
|
Summary Only: Does not include details, but only sub-totals for each of the sort options entered (except employee name) as well as a grand total for all employees. |
|
•
|
Select Sort on Sort Parameters Descriptions to sort the report by the descriptions instead of the codes selected as the Sort Parameters. |
|
•
|
Select Page Break on Primary Sort to start a new page for the selected Primary Sort items. |
|
•
|
Select Suppress Pay Group in Header if needed. |
|
4.
|
Select Other Parameters as appropriate: |
|
•
|
Select the Employee Unique ID from the drop-down (Employee ID, Employee Number). |
|
•
|
Select Include Last Week Worked to include the last week the employee worked in the report. |
|
5.
|
Enter the Report Filters to display on the report: |
|
•
|
Select the Status Class you want to include in the report from the drop-down. |
|
•
|
Select the Employee Type you want to include in the report from the drop-down. |
Note: The system displays settings from the Client Controls form as options in the Employee Type field. If there are no settings in the Client Controls form, then all employee types display.
|
•
|
Enter the field type. The field label displays. For example, if you enter a Location, the Location Name displays. The report displays records for that Location. |
|
6.
|
Click Run. The output displays on-screen. For example: |
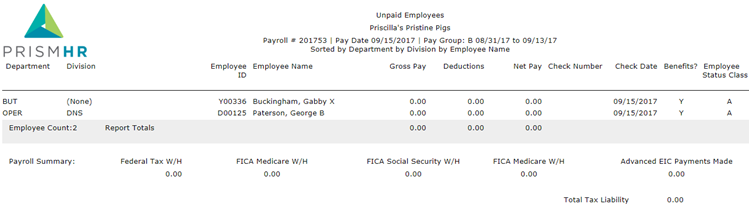
Listed are samples of the report columns, based on selections in the form:
|
•
|
Department: The employee's department. |
|
•
|
Division: The employee's division. |
|
•
|
Employee ID: The employee ID. |
|
•
|
Employee Name: The employee's name. |
|
•
|
Gross Pay: The employee's gross pay. |
|
•
|
Deductions: Deductions applied to the employee's pay. |
|
•
|
Net Pay: The employee's net pay. |
|
•
|
Check Number: The check number for the payroll. |
|
•
|
Check Date: The date of the paycheck. |
|
•
|
Benefits?: Specifies whether the employee received benefits in the payroll. |
|
•
|
Employee Status Class: The employee's employment status. |
|
•
|
Report Totals: The totals for Gross Pay, Deductions, and Net Pay. |
|
•
|
Payroll Summary: All payments made in a payroll batch including federal tax, FICA medicare, FICA social security, as well as employer FICA owed, and advanced EIC payments. |
|
•
|
Total Tax Liability: The total tax liability for the employer. |
