Importing New Hires from Employee Portal
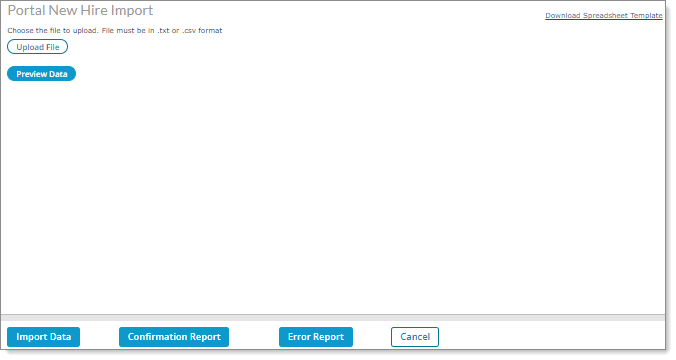
You can use the Portal New Hire Import form to import new hires all at once from several clients who were registered in Employee Portal (EP). After uploading a file for import, you can view any errors that occurred during the import or view successfully imported rows. For example:
Important! This process applies as follows:
| • | This form does not take the place of the New Employee Import process. |
| • | The imported employees will only display on the New Hire Dashboard in Employee Portal (EP). (See the Employee Portal (EP) online help and the Enabling the New Hire Dashboard article in the Customer Resource Center for more information.) |
To perform an import using the Portal New Hire Import form, simply upload a file for import and then view any errors that occurred during the import or view successfully imported rows.
Note the following:
| • | This form is only available for service providers. |
| • | Users whose role is set to INQUIRY for the Portal New Hire Import form displays the form in read-only format. |
| • | Client Access Group security is enabled on this form. |
To import new hires from Employee Portal:
| 1. | Select Download Spreadsheet Template to download a .csv file to your computer that contains the new hires import headings in row 1. A separate window displays the downloaded file link. |
Important! The first row of the import file must contain all the columns in the downloaded spreadsheet template in the same order. (Optional fields with no data can be included, but must be left blank.)
| 2. | Click Open File. The spreadsheet template displays, where you can enter the new hires information. |
The spreadsheet template contains the following columns:
|
Column |
Description |
||||||||||||||||||
|---|---|---|---|---|---|---|---|---|---|---|---|---|---|---|---|---|---|---|---|
|
Employer ID |
Employer ID associated with the new hire (required). Note: If the Employer ID or Client ID is not valid, the system does not validate the remaining data in that row. In addition, this Employer ID must be associated with the Client ID. |
||||||||||||||||||
|
Client ID |
Client ID associated with the new hire (required). Note: You must set Electronic On-Boarding to Prompt or Always in the client-level settings on the Control tab in the Client Details form. Otherwise, the entire import will fail and an error message displays, "Client does not use Electronic On-Boarding. New Hires cannot be imported." |
||||||||||||||||||
|
First Name |
First name of new hire (required). |
||||||||||||||||||
|
Last Name |
Last name of new hire (required). |
||||||||||||||||||
|
Middle Name |
Middle name of new hire (optional). |
||||||||||||||||||
|
Employment Status |
Current employment status associated with the new hire (required). Note: If there are restrictions on the Control tab in the Client Details form, only those employee statuses listed in the form can be used. |
||||||||||||||||||
|
Employee Type |
Employment type associated with the new hire (required). Note: If there are restrictions on the Control tab in the Client Details form, only those employee types listed in the form can be used. |
||||||||||||||||||
|
Work Location |
Work location associated with the new hire (required). |
||||||||||||||||||
|
Position |
Position of new hire (required). |
||||||||||||||||||
|
Start Date |
Date when new hire began employment (required). |
||||||||||||||||||
|
Pay Method |
Pay method associated with the new hire (required):
Note: The Variable Salary option only displays if the VARSALMETHOD custom feature code is enabled on the System Parameters form. You can use the Variable Salary option to accurately track the hours that salary-exempt employees actually work. For example, non-profit companies could use this option to track the work hours of their employees who are paid a standard salaried amount, so they can use these hours and their allocations for grant purposes. |
||||||||||||||||||
|
Pay Rate |
Pay rate that corresponds with the selected Pay Rate Basis for the new hire (required). |
||||||||||||||||||
|
Pay Rate Basis |
Determines the new hire’s pay period (required):
|
||||||||||||||||||
|
Standard Hours |
Standard hours worked by the new hire during the pay period (required). |
||||||||||||||||||
|
Benefit Group |
Benefit group of new hire that can be used to establish eligibility, coverage, and contribution rules for benefit plans (required). |
||||||||||||||||||
|
Pay Group |
Pay Group to which new hire belongs (required). |
||||||||||||||||||
|
Employee Number |
Employee number associated with the new hire (optional). |
||||||||||||||||||
|
Work Shift |
Work shift associated with the new hire (optional). |
||||||||||||||||||
|
Department Code |
Department code associated with the new hire (optional). |
||||||||||||||||||
|
Personal Email Address |
Personal email address associated with the new hire (optional). |
||||||||||||||||||
|
Send Email |
Email address system uses to send emails to new hire (optional):
Note: If this column contains Yes, Null, or is not included in the import and the Personal Email Address contains an entry, the system sends a welcome email to the new hire. |
||||||||||||||||||
|
Division Code |
Division where new hire works (optional). |
||||||||||||||||||
|
Project |
Project associated with the new hire (optional). |
||||||||||||||||||
|
Work Group |
Work group associated with the new hire (optional). |
||||||||||||||||||
|
Union |
Union to which new hire belongs (optional). |
||||||||||||||||||
|
PTO Approver |
Person who approves new hire's PTO requests (optional). |
||||||||||||||||||
|
Manager |
Person that new hire reports to upon employment (optional). |
||||||||||||||||||
|
Mobile Phone |
Mobile phone number associated with the new hire (optional). |
||||||||||||||||||
|
Nickname |
Alternative name associated with the new hire (optional). |
||||||||||||||||||
|
Seniority Date |
Benefit start date associated with the new hire (optional). |
||||||||||||||||||
|
Preferred Language |
Preferred language associated with the new hire (optional):
Note: Leaving this entry blank defaults to English. |
| 3. | Select Upload File. Click Add Files and select the file to upload, then click Start Upload. |
| 4. | Click Close. The uploaded filename displays. |
| 5. | Select Preview Data. (If you select Preview Data before uploading the file, no information displays.) Information displays on the following tabs: |
| • | Errors: Any errors from the import process display on this tab. (Error messages specify the line number where the error occurred.) Click Error Report to view the new hires errors. (A browser window opens where you can download the .csv file that contains the errors.) |
| • | File Content: Any successful rows from the import process display on this tab. The following fields from the import display as a header: |
| • | Client ID |
| • | First Name |
| • | Last Name |
| • | Position |
| • | Start Date |
| • | Pay Rate |
| • | Benefit Group |
Note: If no successful rows display in the file and you select File Content a message displays, "No New Hires to import."
| 6. | Click Import Data to import new hires that display on the File Content tab. The "File content successfully imported" message displays. Click OK. The imported new hires display on the New Hire Dashboard in Employee Portal (EP) where the system generates a welcome code, so these new hires can obtain that code in the New Hire Dashboard. |
Note: Any additional errors that occur during the import display in the existing errors list on the Errors tab.
| 7. | Click Confirmation Report to download a .csv report that contains the successfully imported new hires information. |
Note: Columns that are blank indicate an unsuccessful data import.
