This page has moved and will no longer be updated. To access the current page, click the Online Help  icon in PrismHR or navigate to the new help docs site and search for your topic.
Using the Mass Employee Transfer Import Tool
You can use the Mass Employee Transfer Import Tool to quickly import a list of employees to transfer to new clients.
Note the following:
|
•
|
This tool is only available for service providers who have FULL access to the Mass Employee Transfer Import form. |
|
•
|
Users whose role is set to INQUIRY for the Mass Employee Transfer Import form displays the form in read-only format. |
|
•
|
Users who do not have access to a particular client as configured in Client Access Groups cannot transfer employees into or out of the client using the Mass Employee Transfer Import form. |
|
•
|
This process accomplishes the same results as executing the standard employee transfer process using the Transfer Employee to New Client form. (See Transferring Employees to New Clients.) |
The Mass Employee Transfer Import Tool is available from the Operations|Import Processing menu in the Back Office  . For example, the following form displays after you access the Mass Employee Transfer Import Tool:
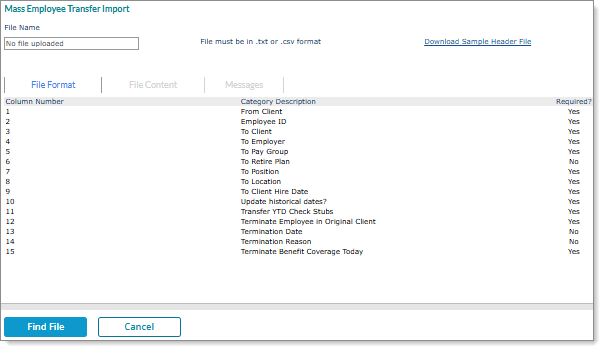
Before you can upload and import data, your source file must be saved in either comma-separated values (.csv) tabular format or text tab delimited (.txt) format with no spaces or special characters in the file name. When you open the Mass Employee Transfer Import Tool form, the required file layout displays. The layout must match the requirements for number and order of columns, category descriptions, and the required fields.
In addition, you can use the sample header file before importing to avoid manually creating an import file that matches the import template type.
Note the following when using a comma (,) in a description in your import file:
|
•
|
If you include a comma in a description field using the .csv file format, you must enclose the item in double quotes. For example, "Manager, Admin." |
|
•
|
If you include a comma in a description field using the .txt file format, no extra formatting is necessary. |
Using the Sample Header File
Before starting the import process, you can first download a sample header file by clicking that link on the Mass Employee Transfer Import Tool form. For example:
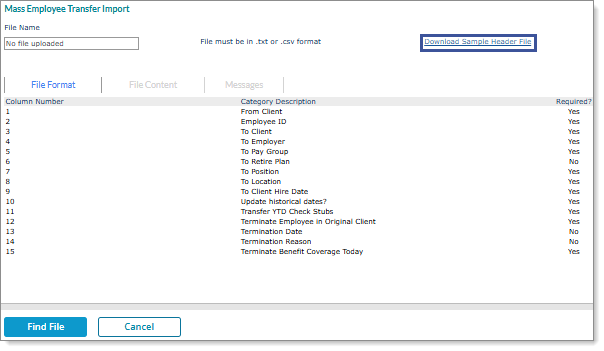
Note: The header file is in .csv format. You can save the file in .csv or .txt format.
After you click the Download Sample Header File link, the system downloads or prompts for download a sample header file that displays columns and headers that match each column and description for the import template option. Also, the file displays a title that matches the selected option.
To perform a mass employee transfer import:
|
1.
|
Select Back Office . |
|
2.
|
From the Operations|Import Processing menu, select Mass Employee Transfer Import. |
The layout requirements are:
| Field |
Description |
|
Column Number
|
The corresponding column number for the imported data.
|
|
Category Description
|
|
•
|
From Client (required): The client ID for the client that the employee is transferring from. |
|
•
|
Employee ID (required): The ID of the employee whose information requires a transfer. |
|
•
|
To Client (required): The client ID for the client where the employee is transferring. |
|
•
|
To Employer (required): The employer ID assigned to the new client where the employee is being transferred. |
|
•
|
To Pay Group (required): The pay group for the destination client. |
|
•
|
To Retire Plan (optional): The retirement plan where the employee is being transferred. |
|
•
|
To Position (required): A valid position for the destination client. |
|
•
|
To Location (required): A valid location for the destination client. |
|
•
|
To Client Hire Date (required): The hire date to use for the company where the employee is being transferred. |
Note: After entering or selecting a date, a message containing that date displays. Select Yes to confirm that date should be used to update the Status, Type, Status Type History, Position History, and Pay History. If you select No, the system updates that information using the most recent date for that record in the From Client employee record after the transfer finishes.
|
•
|
Update historical dates? (required): Indicates whether to keep status, type, status type history, position history, and pay history dates. |
|
•
|
Transfer YTD Check Stubs (required): The year-to-date check stub details to the company where the employee is transferring. |
|
•
|
Terminate Employee in Original Client (required): Indicate whether to terminate the employee and their benefits in the original client. |
|
•
|
Termination Date (optional): The date when the transferring employee will be terminated in their old client. |
|
•
|
Termination Reason (optional): A valid termination reason code. |
|
•
|
Terminate Benefit Coverage Today (required): The terminated group benefits for the employee ends coverage today. |
|
|
Required?
|
Indicates if the field is required.
|
|
3.
|
Click Find File to open the File Upload dialog box. |
|
4.
|
Click Add Files in the File Upload dialog box. |
|
5.
|
Select the specified Import File from your system that you have created. Once selected, the Import File will display in the File Upload dialog box. |
|
6.
|
Click Start Upload to upload the file. |
|
7.
|
Click Close on the File Upload dialog box. |
|
8.
|
The uploaded Import File name will display under the File Name field on the form. The content of the file will display under File Content tab. Errors, if any, will display in the Messages tab. Correct the errors and redo the process. |
While processing the uploaded file, the following validation occurs:
|
•
|
If any mandatory field is missing from the file, the system displays an error message, "<field name> is a required field." |
|
•
|
If the system does not associate the Employee ID with the From Client field, it displays an error message, "Employee <Employee ID> not located in client <From Client>." |
|
•
|
If the values in the Pay Group, To Retire Plan, To Position, and To Location fields are not valid for the To Client record, then the system displays an error message, "Record <To Client>.<field value> is not on file in <field’s filename>." |
|
•
|
In the Termination Reason field, the system identifies a valid value only if the REASON.CODES contain "Termination." If you provide any other value, the system displays an error message, "<Termination Reason> is not a valid Term Reason Code." |
|
9.
|
Click Import to import the content into PrismHR. After the import finishes, the following occurs: |
|
•
|
If Transfer YTD Check Stubs is enabled, the program transfers the YTD check stubs. |
|
•
|
If Terminate Employee in Original Client is enabled, the program terminates the employee on the original client using the corresponding Termination Date and Termination Reason from the upload file. |
|
•
|
If Terminate Employee in Original Client is disabled, the program does not terminate the employee on the original client. |
|
•
|
If Terminate Benefit Coverage Today is enabled, the program terminates the employee’s benefit coverage. |
|
•
|
If the uploaded file contains a mix of employees who are successfully validated and employees that fail the validations, those employees that are successfully validated are transferred appropriately and the employees that fail validation are documented in the error log and are not transferred or terminated. |
|
10.
|
Click Report to view the transaction report. This report contains the following information: |
|
•
|
Successfully transferred employees display "Success" in the Import Status column. |
|
•
|
Employees that failed validation and could not be transferred display “Skipped” in the Import Status column. The “Comments” column for the failed transfer employees displays the error message for whichever failed validation event prevented the transfer. |
