Using the Data Import Tool
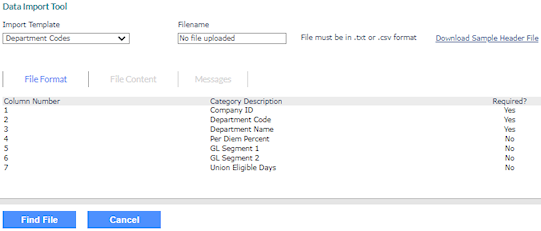
The Data Import Tool lets you upload data and import it into the system. The Data Import Tool is available from the Operations|Import Processing menu in the Back Office  . For example, the following form displays after you access the Data Import Tool and select the Department Codes import template option:
Note the following:
|
•
|
The list of Import Template options display in alphabetical order. |
|
•
|
You can also access the Data Import Tool by selecting its link on the Benefit Imports & Reporting landing page. (You must have either Full or Inquiry access set in your user role for the Data Import Tool (HRPY.WORK*DATABASE.IMPORT.ENTRY). Otherwise, this link does not display.) |
Before you can upload and import data, your source file must be saved in either comma-separated values (.csv) tabular format or text tab delimited (.txt) format with no spaces or special characters in the file name. When you select the import template that you want on the Data Import Tool form, the required file layout displays. The layout must match the requirements for number and order of columns, category descriptions, and the required fields.
In addition, you can use the sample header file before importing, whose link resides on the Data Import Tool form, to avoid manually creating an import file that matches the import template type.
Note the following when using a comma (,) in a description in your import file:
|
•
|
If you include a comma in a description field using the .csv file format, you must enclose the item in double quotes. For example, "Manager, Admin." |
|
•
|
If you include a comma in a description field using the .txt file format, no extra formatting is necessary. |
Using the Sample Header File
Before starting the import process, you can first download a sample header file by clicking that link on the Data Import Tool form after selecting an import template option or from a local form that displays the Import icon ( ), such as the Departments form. For example:
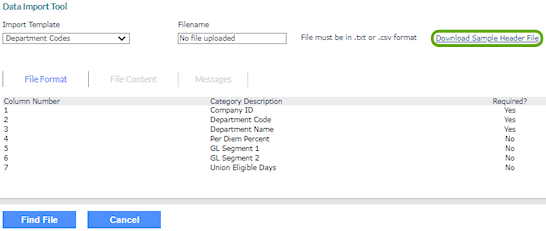
Note: The header file is in .csv format. You can save the file in .csv or .txt format.
After you click the Download Sample Header File link, the system downloads or prompts for download a sample header file that displays columns and headers that match each column and description for the import template option. Also, the file displays a title that matches the selected option.
Note: The sample header file is only available to users who have access to the selected import template option.
Using the Import Templates
The Data Import Tool provides import templates that you can use to import data.
For more information about each import template, click the following links.
| Tab/Field |
Description |
|
Import Template
|
Select one of the following options:
|
•
|
Global W/C Classifications: Client W/C codes and descriptions by state. This import template is only available for service providers and can only be accessed using the Import icon on the W/C Classifications form. icon on the W/C Classifications form. |
|
•
|
Offer Types: Import/update offer types for existing benefit plans. |
|
•
|
Plan Comparison Data: Import benefit plan comparison information into the Comparison Field tab of the Benefits Enrollment Plan Details form. |
|
|
Filename
|
This is the file you uploaded for import. The file name displays after completing Step 3 in the import process.
|
|
File Format tab
|
Displays the required file format to perform the import.
|
|
File Content tab
|
Displays the imported content.
|
Uploading/Importing a Database File
To upload and import a database file in .txt format and import its data, do the following:
|
1.
|
From the Import Template drop-down menu in the Data Import Tool form, select the template type. |
|
2.
|
At the bottom of the form, click Find File. The Upload a File dialog displays. |
|
3.
|
Click Choose File and browse to the .txt file you want to upload. |
If the file uploads successfully, a confirmation message displays. If your file does not upload successfully, an error message displays. Click Close, then click Clear to try again or to upload a different file.
|
6.
|
Click Close to return to the Data Import Tool form, where the file name and the imported content display. |
|
7.
|
Review the content, and then click Import to complete the process. A confirmation dialog displays to confirm that the file content was successfully imported. |
If the import process encounters duplicates, a dialog displays stating the data already exists. Click OK. The Import Duplicates form displays.
To process the duplicate data, you can either click Skip or Replace with New. If you want to apply the action to all data, select the Apply to all option.
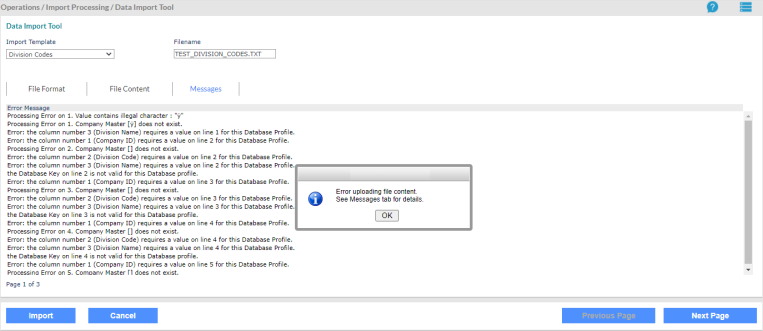
Troubleshooting
If errors occur during the import process, do the following:
|
2.
|
Click the Messages tab and review the error messages. |
|
3.
|
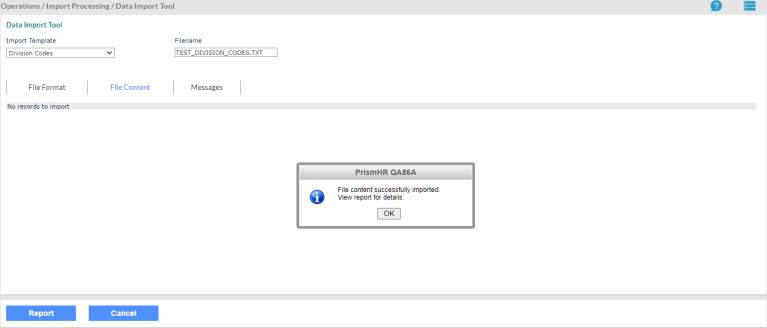
Click Import to proceed. If the import is successful, a confirmation dialog displays. |
|
4.
|
Click OK to proceed and view the report or click Close to restart the process. |
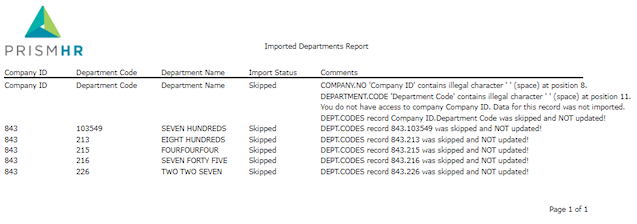
Viewing the Report
To view the report on the data you uploaded and imported, do the following:
Click Report.
The data displays in a report format, which includes the Import Status results. The report (see example below) displays all imported records and includes any records that were skipped.
When you finish reviewing the report, close the report window and click Clear to upload another file.
