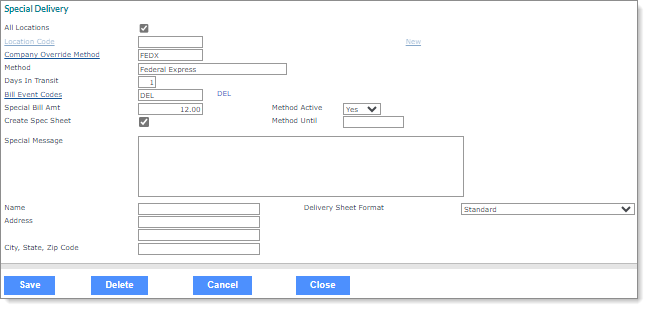
Defining Payroll Shipping Methods for the Client
Use the Special Delivery form to define methods that users can select for shipping the client’s payrolls. For example:

To define payroll shipping methods for the client:
|
1.
|
Select All Locations if the delivery method applies to all locations. If this is selected, the system charges a single fee for the whole client. |
|
2.
|
If you did not select All Locations, click New and select one of the client's worksite locations, or enter the code for a location that already has a delivery method defined for it. |
|
3.
|
Enter the Company Override Method, which is one of the delivery methods defined in your system. This overrides the default. |
|
4.
|
Enter the Method description, which is usually the name for the service (for example, US Postal Service or FedEx). |
|
5.
|
Enter the Days In Transit, which is the delivery method’s number of days in transit. |
|
6.
|
Enter the Bill Event Code, which is the ID of the billing event that the system uses to track this delivery method. If there is no charge for the delivery method, leave this field blank. |
|
7.
|
Enter the Special Bill Amt to override the standard billing amount for this client, if appropriate. |
|
8.
|
Use the Method Active drop-down to indicate the status of this delivery method: |
|
•
|
Yes: This method is available for users to select. |
|
•
|
No: Users cannot select this method. |
|
•
|
Once: Select this if the method will be used only once. After it has been triggered, the system sets it to No. |
|
9.
|
In the Method Until field, enter the date when delivery method should stop being used for the client. After this date, the system sets the Method Active to No. |
|
10.
|
Select Create Spec Sheet to indicate that a special sheet will print during payroll processing. Do not select this option if a special sheet is not necessary. |
|
11.
|
If a special sheet will print: |
|
a.
|
Enter the Special Message that prints on the sheet. |
|
b.
|
Enter the Name that should appear on the sheet. |
|
c.
|
Enter the Address to print on the sheet. |
|
d.
|
Enter the City, State, Zip Code to print on the sheet. |
|
12.
|
Select the Delivery Sheet Format, which ensures that the address on the printed delivery sheet displays in the window envelopes your organization uses. You can select one of the following: |
|
•
|
The Standard and Expanded options display no line or indent adjustment fields when selected, and the delivery sheet prints the entered data in a fixed position. |
|
•
|
The Large Window, Large Window (Expanded), Large Window - 1 Page, and Large Window - 1 Page (Expanded) options display adjustment fields for Delivery Sheet Address Line and Deliver Sheet Address Indent. The delivery sheet prints the entered data using these specified adjustments. |
|
•
|
The 2 Window, 2 Window (Expanded), 2 Window - 1 Page, and 2 Window - 1 Page (Expanded) options display adjustment fields for Delivery Sheet Address Line, Deliver Sheet Address Indent, Client Information Line, and Client Information Indent. The delivery sheet prints the entered data using the specified adjustments. |
|
•
|
The 2 Window (Shipping on Page 2) and 2 Window (Expanded) (Shipping on Page 2) options, in addition to the adjustment fields described above, print the address on the first piece of paper and the Special Message on the second sheet. The purpose is that the person who is preparing the envelopes can insert the address into the envelope and then read the instructions on the second page (what type of envelope to use, which mail bin to place the envelope in, and so on). |
Note: If you select one of the 2 Window formats, you must enter the full address.
After changing these settings, you can rerun the delivery sheet report from the Payroll Summary form, if needed.
Parent Topic
Maintaining Client Details

